Showing posts with label make up. Show all posts

Tuesday, 22 April 2014

Shopping The Stash #1


Following my recent haul and the fact that I'm saving for a holiday, I've installed a bit of a spending ban upon myself. I've been avoiding Boots and Superdrug like the plague and so have found another way to evoke that new-product excitement: raiding the hidden depths of my beauty drawers. Of course a lip balm had to be involved in this rotation: I have so many that I do need to remind myself to use them. The pleasant oiliness of the Maybelline Baby Lips is a long-term favourite of mine, but one that has been neglected. Another lip product is my Lush Bubblegum Lip Scrub. I can't believe I forgot about this, but it's nearing it's use-by date and I want to make sure I make full use of it before it needs to be disposed of. Next we have a Natural Collection eye shadow, a lovely chocolatey brown that I've been using in my eyebrows in the place of a pencil. Finally, I picked up the Rimmel Scandaleyes Retro Glam mascara from my big box of mascaras and swapped it for what I'd been using previously. Welcome to the make-up bag.

xx


Saturday, 8 March 2014

February Favourites!

 
Hello everyone! I know it's a little late but I thought I'd share my February Favourites. I'd been stuck in a bit of a rut beauty-wise lately and so through-out February I made an effort to try different things in an attempt to freshen my routines.
 
 
Naturally a few Lush products had to make it's way into this post. I bought the Karma solid perfume (£5.00) as a birthday present to myself and have been wearing it every day since. It's such an uplifting, zingy, citrus scent and it puts me in such a good mood and I've received so many compliments about it! It's certainly not a subtle scent and it's a little on the spicy side, but it's vibrancy puts me in the mood for the summer months! Also featured is the Close To You massage bar. Sadly this was limited edition, but I got it for Valentines Day from my boyfriend! I have used this for it's intended purpose as a massage bar on my legs and my shoulders and it works amazingly, it gives just the right amount of slip and slide without being greasy or oily. I use this more often as a moisturiser on my legs, I simply sweep the bar along my skin and massage in to moisturise! Recently I've also started trying to make more of an effort with my eye make-up. I'm a lipstick kind of gal usually, but I got the Collection Eye Shadow Pencil in Vintage Blush (£3.19) for my birthday which is a creamy slightly shimmery pink shade. It's a cream eye shadow which is something I haven't tried before and it lasts for hours and is waterproof! A bit of a pain when trying to remove it, but it's long lasting trait makes it a favourite this month! Paired with this pencil I like to apply a little powdered eye shadow in the crease of my eye to create a little shadow. I've been using the MUA Undressed palette (£4.00) for this purpose and have been working the third colour on the bottom row into the crease with a fluffy brush to create a subtle smokey effect. Finally, beauty-wise, we have the Real Techniques Contour Brush (only available in the core collection) which I use to apply my highlighting pearls and a touch of peachy blusher. It's the perfect shape to apply specific highlight but also is great for blending blushes easily. Last of all I wanted to feature my new watch, it's face is patterned with a map and the strap is white faux leather. I picked this up for just £1.64 from eBay and am looking forward to pairing it with a white crop top and pale shorts in the summer! (Click here for the link)
 
xx


Wednesday, 11 December 2013

5 Minute Make-Up Kit


I'm not ashamed to say that due to the current chill in the air in England I've accidentally-on-purpose overslept for college a couple of times pretty much every day this past two weeks (it's my duvet's fault, not mine). I'll be snoozing my alarm from 7:30am right up until 8:15am when I'm supposed to be leaving at 8:30am to make sure I give myself enough time to walk up to my friend's house for 9am.
 
So over the past few days I've managed to pull together a sort of last-minute make-up routine that takes all of five minutes and gives me enough confidence to leave the house without looking like I've overslept/a zombie.
 
The first step once I've pulled my hair up into it's mandatory bun (college salon rules) I apply a little lot of the Collection Cover Up Stick underneath my eyes and blend it out with my fingers to cover my dark circles. Next, I take my MUA Cover and Conceal Concealer and dot it across my face, concentrating on any blemishes or redness. I blend this out with my foundation brush. To add some definition to my eyes, I like to use both ends of my Rimmel Double Ended Kajal Stick, running the white end along my water line to brighten and awaken and the black end up beneath my lashes to add some depth. I finish with a few sweeps of my 17 Blow Out Mascara onto my lashes and a slick of my Maybelline Baby Lips in Pink Punch on my lips to give a pop of colour since I'm lacking any blusher.
 
So there you have it! I hope I've given you guys some ideas on what products to use when you're in a rush, they certainly do the job for me!
 
xx

Saturday, 7 December 2013

Christmas Gifting: For The Girls (Mum, Sister, Mother-In-Law)


Hello lovelies! I hope you're all well and feeling prepared and excited for Christmas.
 
Today I thought I'd give you guys a little sneak peek into what I'm going to be gifting people for Christmas this year. Don't worry, there's no chance of any of these people finding out about their gifts: most of them don't even know I run this blog! My boyfriend and I were on a strict £10 per person budget this year so I thought I'd show you guys in case you needed a little budget inspiration. I'm very very happy with what we've bought and think all of the individual people are going to adore their gifts!
 
-----
 
My little sister is only 6 years old but has definitely fallen in love with what she calls a 'spa bath' which is to say a lovely warm bath with a lush bath bomb and a delicious lit candle (of course she is supervised at all times!) so this year for Christmas I thought I'd stop her hacking into my Lush stash and give her the beginnings of one of her own.
 
 
Of course the obvious choice was FUN: Lush's 5-in-1 product that acts as a shower gel, bubble bath, shampoo, soap and a sort of play-dough. We chose the Limited Edition gold version (although they do offer five other shades that are permanent in the Lush range) which has the same scent as their Honey I Washed The Kids soap. This was £5. Next we decided upon the Space Girl bath bomb which is shaped like a planet and is dusted with glitter. This has a blackberry scent and is packed with popping candy which I'm sure she's going to love! This was £2.25. From Tesco I picked up the bauble filled with miniature bath bombs which was on sale for £1.50 and should keep her going for a while. Finally her last two gifts I got at Sainsbury's: the pink Smarties tube (£1) and the Ice Cream Print Notebook (on sale for 89p). I just have to get some accompanying felt tip pens and she's all sorted!
 
-----
 
Honestly this year the hardest person to buy for was my mum. Whilst she likes candles and perfumes she isn't the sort of person who enjoys long soaks in the tub or slowing down with a good novel - trust me, I've tried to sway her - so I decided that instead of giving her something to help her relax, I'd gift her something I know she'll actually use.


I dreamed up this sort of survival pack to keep in her bag when she goes to work. It contains chewing gum, lip balm, mini hand sanitisers, nail varnish remover wipes and her favourite Hand Food hand cream by Soap & Glory. As a little nod towards the pampering side of things I also threw in her favourite Barry M Nail Varnish - Mushroom. The lip balm, chewing gum, hand sanitiser and nail varnish wipes I picked up in the Poundshop but the Hand Food and Barry M Nail Varnish I got from Boots.
 
-----
 
My boyfriend's Mum was also quite difficult to buy for this year as she's the direct opposite of my mum - she loves a good pamper - but has really sensitive skin so can be allergic to some things she's received for Christmas over the years. I thought the safest bet was to go back to Lush and pick up her favourite Porridge soap: a lovely soap packed with porridge oats to help gently exfoliate and sooth skin. The good thing about Lush's soaps is that you can choose a piece to suit any budget (as long as it's over 100g). We also got her two Butterball bath bombs for their soothing cocoa butter and delicious scent as she prefers the simpler bath bombs that doesn't require her 'picking rose petals out of the bath' as she once told me. The Bath Bombs were £2.50 each so we got her a £5 piece of soap to make up her £10!
 
-----
 
As for my best friend - she does know about my blog and even though I told her I'd be posting her gifts so not to go on here, she might do just because I asked her not to. So I'm afraid I'll be keeping her gifts as a secret just in case!
 
I hope you enjoyed this post and have hopefully gotten a few more ideas for last minute gifts! I should hopefully be posting a 'Boyfriend Edition' of this post as I haven't wrapped his presents up yet but that wont be for a few days.
 
Hope you all have a lovely weekend!
 
xx

Friday, 29 November 2013

Review: MUA Heaven & Earth Palette


Sorting through my beauty stash the other day, I realised something: I don't own many nudey eye shades. I was quite surprised by this, simply because it seemed like such an obvious thing to own. The subtle glam that a simple, soft brown smokey eye can bring to any day or night look is something that I'm personally a fan of so I honestly didn't expect to be lacking these shades in my collection. Naturally, the only plausible thing to do would be to go out and buy said shades, which is exactly what I did: enter MUA's Heaven & Earth Palette.
 
 
This 12 shadow palette contains a variety of brown tones, ranging from dark chocolate to buttery cream. All colours are 'shimmer' but not in a glittery or gaudy way - they're more luminous than anything. They're lovely to apply and very blendable, with very little fall out.
 
 
As they don't have shade names I'll brand them with numbers 1 - 12, starting from the top left and finishing at the bottom right. My most used colours are 4, 9, 10 and 12 - number 4 as a base and highlight, 9 and 10 for creating the smokey line and number 12 as a sort of eye liner along my eyelash line. Pigmentation for these shadows are great and they last all day.
 
 
Shades 1 - 6 (top row)

 
Shades 7 - 12 (bottom row)
 
Avaliable for £4 from Superdrug or the MUA Online store, this palette is a must-have for nude eye lovers or even for younger girls who are beginning to build their own make-up collection. A perfect stocking filler, too!
 
xx


Friday, 11 October 2013

My Top 4 Statement Lips (Best & Worst!)


Okay, so I have this little obsession with lipsticks. I don't really know where it came from as up until last year I had the opinion that lipstick was for more mature, sensible women than me and I was completely all about the eyes.
 
But since the day that I changed all that, I've grown quite a collection. I think lipstick is the thing I have the most random purchases of - even if the colour definitely isn't suitable for my look or my skin tone, I always buy it... just in case.
 
So today I thought I'd show you guys my top 4 Statement lipsticks (best & worst).


Left to right: Nivea Volume Shine Lipstick in Mauve Parure - Barry M Lipstick in 129 - Rimmel Moisture Renew Lipstick in Rogue - MUA Lipstick in Nectar
 
 
Nivea Volume Shine Lipstick in Mauve Parure -
 
One of my post recent purchases - a gorgeous deep berry toned purple. The formula of this is very thick and is one that definitely needs a brush to be applied or it will go everywhere. It has good staying power once applied in layers and adds drama to any outfit. I would recommend keeping all other make-up simple for a day look, where-as adding lashings of mascara and a cat-eye looks amazing with it for a dramatic night-out look. I got this for £1 from Poundland.
 
Barry M Lipstick in Shade 129 -
 
This lipstick is the 'worst' mentioned in the title. I was so excited when I bought this lipstick as I've been dying for a pale purple lip shade but sadly this was such a disappointment! The formula is so shiny and never dries so the slightest touch of your lips will cause a blur! The shade is completely un-wearable for me as it makes everything seem so yellow! My skin looks unhealthy and sallow and it's not very flattering for even the whitest teeth. Such a shame as it's a lovely pale pink toned lilac but it just doesn't work for me! I paid £4.25 for this from Boots.
 
Rimmel Moisture Renew Lipstick in Rogue -
 
Although it looks much darker in the tube, this lipstick has a lovely deep red tone. In my photo it doesn't translate well (I think it was the bright lighting) but it works very well with my pale skin and looks perfect with just a few slicks of mascara for a ' I look like I've tried when I actually haven't' look. The staying power of this is incredible - I applied at 8am and it was still going strong at half past 2pm - and once dry it's not too matte or shiny. My lips simply look moisturised! I got this for £1 at Poundland.
 
MUA Lipstick in Nectar -
 
This lipstick is definitely my favourite out of the bunch. A gorgeous bright, wearable orange that sits beautifully upon lips and lasts for hours. It's brightness doesn't wash me out at all, in fact it seems to give some life to my face! It applies really well straight from the tube but does require layers if you want it to last all day. This lipstick can be taken from day-to-night with just an outfit change, I love it! I picked it up from Superdrug for just £1!
 
So there you have it! My top four best and worst statement lipsticks.
 
I hope you enjoyed this post and I hope you all have a lovely weekend!
xx


Sunday, 15 September 2013

Cheap Make-Up Storage Solutions #2


Hello everyone!
 
I have posted once before about what I use to storage the majority of my make-up (take-out boxes, anyone? here) but thought I'd give you a little insight into my new 'Blogging' table and the little storage solution I arranged to go with it.
 
This idea will definitely apply to any youtubers/bloggers/make-up obsessers (is that a word?) as, if you're like me, you end up purchasing new products on a regular basis and always remind yourself to try them out but never get around to it. This idea should help you out!
 
I was doing a spot of charity shop shopping the other day when I came across this beautiful tea set. It consisted of two teacups and saucers, a plate, a mini milk jug and a sugar bowl, and all for only £3! The set is made from frosted mint green glass that's covered in gorgeous metallic gold polka dots. I absolutely ADORE it. I've used one of the teacups and saucer sets for my rings, the sugar bowl for stray bobby pins and hair bands and here I'll show you what I've done with the milk jug and the plate.


This is how I store all of my 'try-outs' and 'to be reviewed' products. As you can see I have a few things placed here waiting to be used, so as well as showing you my storage idea I've given a little sneak peek into what reviews are coming up on my blog!
 
Personally, I think that having all of the products out on display like this (and conveniently placed right next to my bed) keep it fresh in my mind what products I've been meaning to try and also I just think it looks nice!
 
 
As you can see, tucked slightly behind the plate is the milk jug which I've chucked a few random pens and a pair of scissors in so I don't lose them! Just out of shot to the right are my blogging & college notebooks and my current novel of choice (The Night Circus if any of you were wondering!)
 
Hope you're all well, guys!
 
xx


Saturday, 14 September 2013

Review: Maybelline Baby Lips!


You know sometimes you have those moments with a new product and you literally think to yourself, "where have you been all my life?!" That's what I feel about the Maybelline Baby Lips. I was a little late on the bandwagon with this one as I really didn't know if through all the hype, the product itself was actually worth buying. How wrong I was.


The Baby Lips I opted for is 'Pink Punch' a deliciously sweet smelling balm that provides your lips with moisture and a light pink tint. The formula of this lipbalm is incredible, it literally is the softest thing ever! It glides across lips smoothly and evenly, coating them with the gorgeous sheen as it goes.


I first applied this a few hours ago, and the hydration is still going strong. Bizarrely, so is the scent. It's a very, very sweet scent that's really potent so if you don't like sweet smells I'd give this a miss as you'll literally be smelling it all day! It sort of reminds me of Lush's Think Pink bath bomb, so if you're a fan of that you're going to love this.
 
Another thing I adore about this product is the super cute packaging. The product itself is in a normal 'lipstick' style tube with a twisty bottom which I prefer in a lip balm, and the plastic is the most gorgeous bubblegum-ish pink shade. The cap is clear plastic with 'Maybelline Baby Lips' written in sherbert yellow in an almost graffiti font. If I'm being honest, it kind of reminds me a little of the 17 Blow Out Mascara.  It's fresh and fun and I love it.
 
Superdrug are currently running a promotion for two Baby Lips for £5, which I definitely would have considered if I hadn't already spent all my money! I paid £2.99 for mine and I don't regret a penny.
 
xx


Sunday, 8 September 2013

DIY Sunday: How I Clean My Make-up Brushes!

 
I don't know what it is, but I am so lazy when it comes to keeping things clean and tidy. Believe me, if you could see my bedroom floor right now, you'd see most of my outfits from the past week. Which is totally disgusting, I know, and I'm gonna sort it out in a minute don't worry, but if there's one thing that I always always keep sanitary it's my make-up and my make-up brushes.

There was a point in my make-up wearing life that I didn't actually clean my brushes all that often, and my skin really suffered from it. Picture this: you have a breakout and, naturally, conceal those little suckers with some foundation using your foundation brush. You might then, maybe, add a touch of translucent powder to set it, using your powder brush. All of those germs that come from touching those spots, are going to transfer onto your brushes, then back into your products and then, the next day when you use them all again, back into your skin.

I make it a habit to give my brushes a really deep clean every Sunday, ready for use on the Monday morning when my make-up wearing routine starts again. Of course, if my skin has been misbehaving that week then I might give them a quick rinse if needed, but mostly it's just a Sunday thing.


To clean my brushes, I use Johnson's Baby Shampoo. It's really gentle on both synthetic and natural bristles and gives a really good lather to ensure your cleansing from root to tip. Alternatively, you could mix a little surgical spirit with some water (we do this at college), or of course use a professional brush cleaner. I hear Mac does a good one, but my baby shampoo does the job for me!

What you will need:

Lukewarm water. If your water is too hot, it could loosen the glue over time.

A bowl/a sink.

Baby Shampoo/Brush cleanser of your choice

Hand Sanitizer

Tissue/a small towel

Make-up Brushes

Steps:

Step One: Before I do anything, I always give my hands a quick cleanse themselves with a squirt of hand sanitizer. I then rinse thoroughly under the tap just to be sure they're clean!

Step Two: Dip the tip of your brush into the water. Immerse fully, but try to concentrate on the tips of the brushes - this saves the glue from wearing down over time, and the majority of your make-up will be thicker at the ends.

Step Three: Apply a small blob of baby shampoo to the palm of your hand, depending on the size of the brush.

Step Four: Swirl your brush into the shampoo. Don't be afraid to apply a little pressure - you want to ensure all of the bristles are covered! Keep swirling until it creates a thick lather.

Step Five: Rinse your brush in the water. This process will probably take a few dips to make sure all of the bubbles and make-up residue has been removed. I prefer to do this under a running tap, just so I can gauge when the brush is clean as the water runs clear.

Step Six: Reshape the bristles of the brush with your fingers and then lay it down on a thick wad of tissue to dry.

Step Seven: Repeat for all of your brushes!

It really is that simple guys! The trick to getting really clean brushes is to work as thoroughly as possible, and perhaps even double-cleansing if necessary. I tend to do this with my foundation brush as it's my most used and most clogged with product.

I leave my brushes to dry naturally overnight so they're fresh and ready to use the next morning.

What do you guys use to clean your brushes?

xx

Thursday, 5 September 2013

Review: Max Factor Lipfinity Lip Tint


I don't know what it is, but there's just something about red lips that makes me feel confident, powerful and, frankly, empowered. If I'm feeling a bit crap, or I've woken up late and need to look like I've made an effort when I really haven't, I always lean towards a bold red lip to help me through the day.


My very dearly beloved favourite is my Lipfinity Lip Tint by Max Factor, a felt-tip pen like lip colour that literally lasts all day long. And I'm for reals here, guys. It lasts ALL DAY. From long morning bus journeys and lunches to me chewing on my lips when I'm nervous, it doesn't budge. Not one bit.
 
The shade I have is 09 (no shade names, boo), a gorgeous deep red shade that is totally wearable and works really well with my pale skin tone. Personally, I think that the shade itself will be slightly altered depending on the natural colour of your lips as it tints instead of sits on top of your actual lips like normal lipsticks and glosses.


Applicator-wise, this felt-tip pen style allows precision when applying the tint as the point is very sharp and accurate (without being uncomfortable) and gives a very controlled distribution of the product itself to allow a neat finish. The trick to this is to line the lips first, and then fill in afterwards, kind of like what I used to do with my felt tips when colouring a picture!
 
Sorry, five year old moment there.
 
Moving swiftly on, the product itself is reasonably fast drying, which in itself is a help and a hinderance. It's useful because it means once the colour is in place, you can pretty much just carry on with your day and forget it's there, and it doesn't leave a sticky, heavy feel upon your lips. However, if you don't have the steadiest hand, you should prepare yourself to remove mistakes quickly!
 
The one thing that does irritate me a little about this is that it's not exactly waterproof - sure, I can drink from a glass/bottle without it running all down my chin and it's safe in the rain but poolside (let's all pretend we're going to be around a pool/beach for a little while longer!) it's going to be a problem if you're planning on going for a swim/being thrown into the pool by an annoying relative.


Either way, I am absolutely in love with this product, and it's reasonable price (£7.99) makes it even better. The shade range isn't the best, but because they have my perfect red I think I can forgive them for it!
 
-----
 
First week at college passed without any incidents, although my bus did drive past me this morning which was irritating, especially considering I woke up extra early to catch it! Starting on Body Electricals and full body massage next week, can't wait! Hope you all had a lovely first week back or, if you haven't/don't need to go back, I hope you all had  a lovely week having lie-ins.
 
xx


Sunday, 25 August 2013

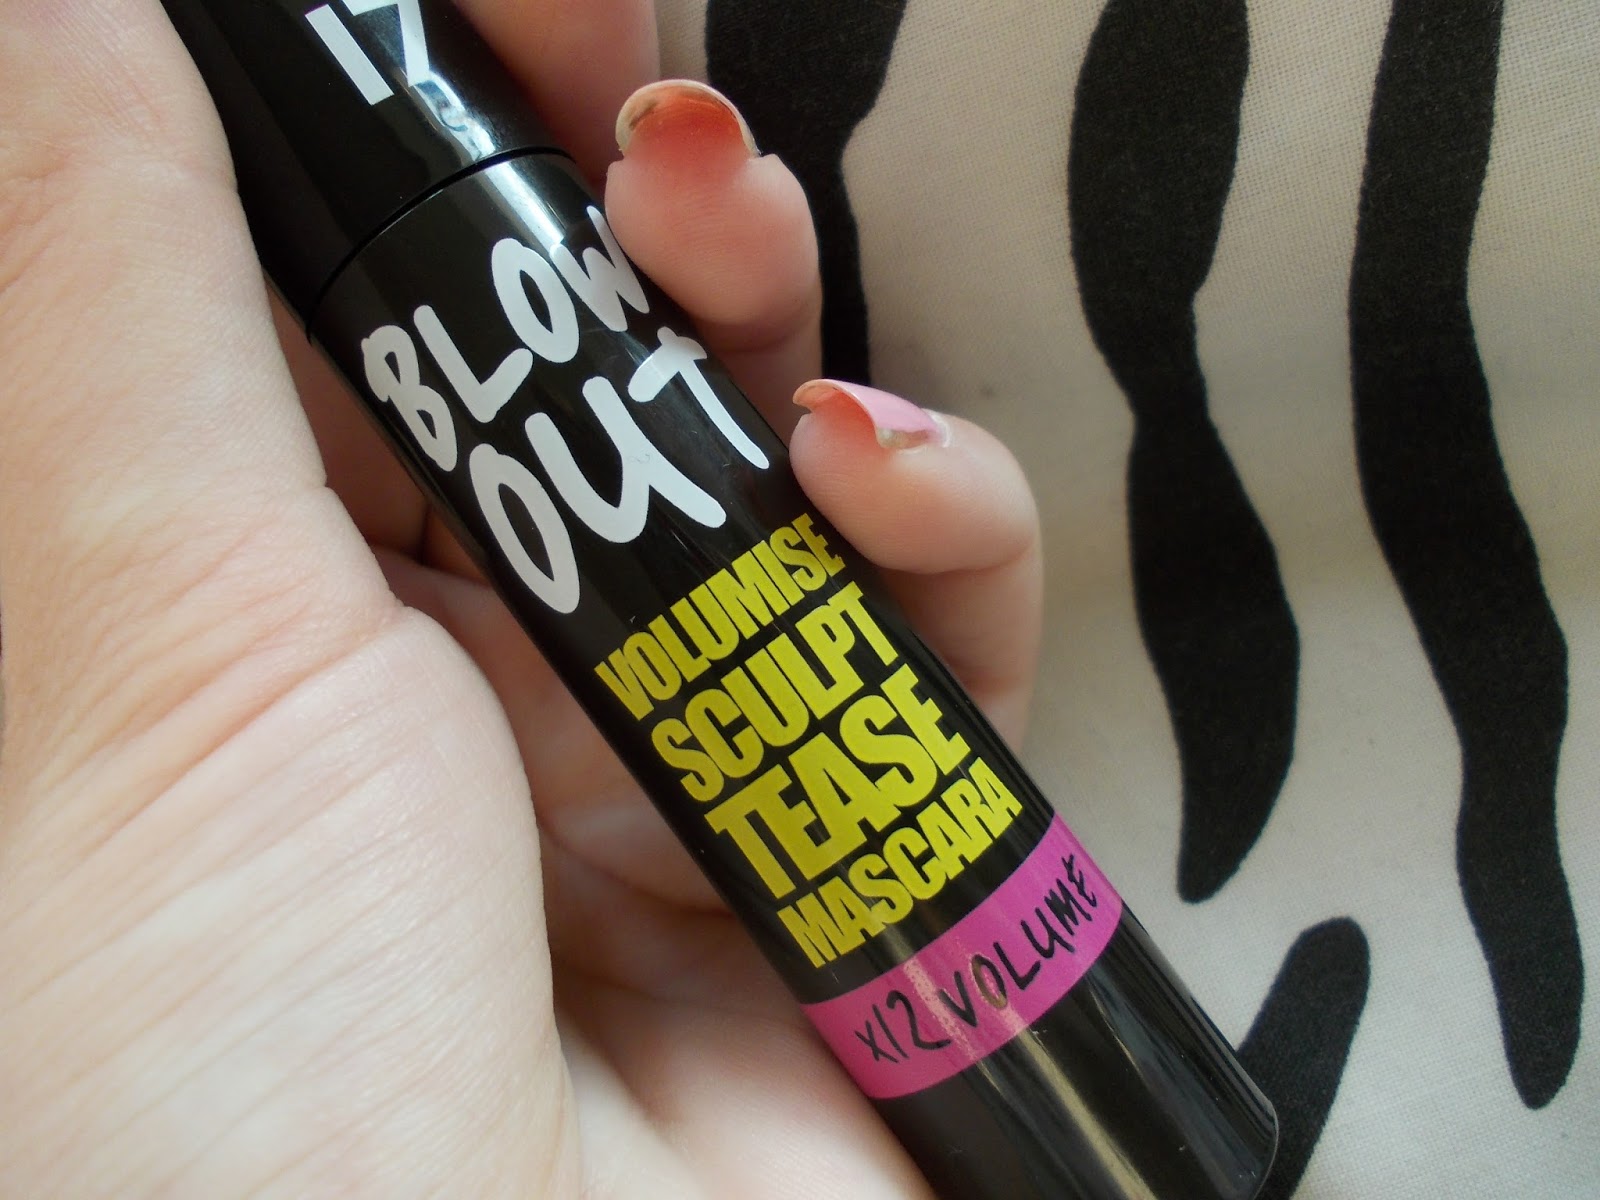
Review: 17 Blow Out Mascara


When it comes to mascara, I expect a lot. I desire long fluttery lashes that are perfectly curled and volumised without being heavy and clumpy. I thought I'd found my 'holy grail' mascara in my Max Factor Masterpiece Max, but sadly it's time has passed so I was on the look out for a new replacement. Cue 17's Blow Out, with it's promises of 12x volume and 'bigger, bolder, bouffant lashes'.


The first thing I noticed about this mascara was, obviously, the packaging. It comes in a thick, easy-to-handle tube that's jet black with fun neon writing. It's certainly not the most aesthetically pleasing packaging I've ever seen, and it's by no means sophisticated but I quite like it, I think it's quirky.


I'm also loving the brush. It's a lovely thick brush that's very easy to use, even on bottom lashes. You'd think due to it's size it would be very messy, but I find it's super easy to coat the bottom lashes with the briefest touch of the brush. The bristles slick through my lashes perfectly, providing even coverage and no clumps.


The formula itself is also really nice, and is enriched with Vitamin E and Argon Oil for deliciously nourished lashes. This mascara is lightweight even when I'm wearing a lot of it, which is only needed if I'm going for a really dramatic look as it's so volumising even with the slightest bit! The difference between my lashes with and without this mascara just proves how good it is, and in these pictures I only applied one coat very quickly. It's also unscented, which is great as I find some that come with a faint scent always irritate me.
 
 
What do you think of this mascara? Have you ever tried it?
 
This mascara (as well as several other 17 ones) are currently on offer for £4 at most Boots stores.
 
xx


Wednesday, 31 July 2013

Review: Collection Extreme 24 Hour Felt Tip Liquid Liner

 
Hey dolls :)
 
I've never been much of a fan of liquid liner, mostly due to my disagreements with the sometimes long-drying formulas and the messy applicators, meaning I've always relied on mascara to make my eyes stand-out. Cue Collection's Extreme 24 Hour Felt Tip Liner.
 
I chose to put the heavy task of renewing my faith in liquid liners on this easy to use 'felt tip pen' styled liner. Collection claims it's an 'All day wear felt tip liner for perfectly defined lines. Easy to apply, fast dry formula."


Here's a breakdown of my opinions on these claims:
 
All Day Wear: This I can agree with, up to a certain point. I wouldn't go as far as saying it lasts 24 hours, although the testing line I drew on my hand when I bought this at Boots is still on my hand this morning, albeit containing a little less colour. However, this liner is far from waterproof so be careful wearing extravagant lines whilst out in the rain - these two things definitely do not mix.


Perfectly Defined Lines: The point of the pen is very precise which is great when drawing straight lines and also when winging out into a flick. Also, despite the thick appearance of the point, it's easy to draw thick or thin lines. Although, as you can tell from the lines I've drawn, the colour isn't the darkest, but you can barely tell when used with mascara.


Easy To Apply: Following the opinion from above, the point of this pen is great which makes it very easy to use. Also the 'felt tip pen' style of the bottle makes it very easy to grip onto as it's quite wide which makes it really easy to get your hand steady.


Fast Drying Formula: Agree, although it's a good and bad thing. The good thing about it is that it literally dries in three seconds flat, meaning you no longer need to risk the blink that will ruin everything! The bad thing about it is that if you make a mistake you can't simply wipe it away.
 
Overall I adore this eyeliner pen, especially for it's £2.99 price!
 
xx

Wednesday, 10 July 2013

First Impressions: Rimmel Match Perfection Foundation

 
Hi everyone!
 
So I know I mentioned in my previous post that I was going to upload my Boots Haul but I've been having some problems with my camera and as I was going to upload it as a video, I've been putting it off until it's working again! I'm just beginning to figure out what's wrong with it so the post will be up as soon as possible!
 
In the mean time, I thought I'd share with you my first impression of my new foundation, Rimmel London's Match Perfection. As you may have read previously (I think I've mentioned it at some point), I don't wear a lot of foundation, mostly because I don't feel my skin benefits from it very much. However, as I've been going out so often lately due to the insane amount of sun we're getting in the UK I thought it was time I re-invested in a new shade.
 
Following a recommendation from a friend of mine (and the fact that this foundation was on offer!) I bought this one, in the shade 010 Light Porcelain. I find that this shade is a perfect colour-match for me and due to the fact it's a slightly warmer shade than I'm used to, I imagine it will work for me even after I've tanned a little more.


Similar to a tinted moisturiser, the consistency of this foundation is silky and light when applied with either a brush or with my fingers when I'm in a rush! The coverage is only light, but that's how I prefer my foundation and it blends perfectly despite it's sheerness. If you're someone who's looking for more heavy coverage, I probably wouldn't recommend this unless you had an amazing concealer to pair it with! My skin has been behaving itself for the past couple of days, so I'll definitely update you on what it's like tackling more serious redness/blemishes.
 
Another thing that I love about this foundation is the smell. As it contains SPF 18 (an essential in this weather!), the scent reminds me of days on the beach and sun tan lotion. This foundation is a summer must-have for me!
 
Also, as the foundation gets dispensed through a pump in the top of the bottle, it's super hygienic and easy to control how much or how little you want. Just don't push down on the pump too hard or it gushes out!
 
As you may be able to tell, I am in love with this foundation! I'm suffering though a cold-sore at the moment, but as soon as it clears up I'll update you on this foundation along with before and after photos!
 
Have you tried a Rimmel Foundation before? What did you think of it?


Sunday, 7 July 2013

Repurchases #1

 
Hi everyone, hope you're all well.
 
Just a quick post, as the weather in Bristol today is bright and sunny and I intend to soak up any opportunity to add a little colour to my super-pale legs I can get! But I thought I'd quickly show you a couple repurchases I made on my trip into town this morning.
 
 
1. Collection Cover Up Stick in Light Translucent, £1.99, Superdrug
 
I'd been meaning to repurchase this concealer for such a long time, but I waited until the last possible minute to get one. My last one of these lasted me for well over a year and I prefer it to many other concealers I've tried! I use this under my eyes, and I find it's a perfect colour match for me, which is surprising as I always have trouble finding one pale enough. Also the buttery, creamy consistency blends amazingly without settling into lines or flaws.
 
2. Natural Collection Blush in Pink Cloud, £1.99, Boots.
 
The first one of these I had was only a recent purchase of mine (a few months ago) and you can see the full review including photos of colour finish here but, as I mentioned in the review, the packaging isn't the best and I unthinkingly left it lingering in my bag and the whole pan shattered! As Boots is currently running a 'buy one get one half price' I thought I'd pick up another (full Boots haul coming tomorrow!). The colour pay-off of this cute little blush is amazing, and despite the lack of colour range the product themselves are really good quality.
 
3. MUA Lipstick in Shade 4, £1, Superdrug.
 
I haven't actually ran out of my original lipstick yet, but this is probably one of my most-used and whilst in Superdrug recently I had a spare £1 on me so I grabbed it. Ultra moisturising with a gorgeous, sheer pink colour, this lipstick has been one of my 'current make-up faves' since the original post back in April (post here).
 
That's all I have for today, but I'm planning to upload my full Boots haul tomorrow, along with a few Poundshop purchases thrown in for good measure.
 
Hope it's sunny where you are! 


Friday, 14 June 2013

Cheap Make-Up Storage Solutions #1


I'm nothing if not resourceful when it comes to storage solutions, and I'm also a crazy organisational freak, so whilst me and my family were eating our tea a few nights ago and I watched my brother chomp down on his Chicken Fried Rice straight from the plastic box it came in, inspiration hit me!


This is one of the drawers that I stash all of my under-used make-up in. I had been pondering for a while how best to store all of this make-up in such a way that it didn't take me five minutes to find the eyeshadow I was after, but every storage solution I looked at online/in store was always more than I was willing to pay.

So what you see here are three Chicken Fried Rice cartons that I've put through my dishwasher twice and hand washed once just to be thorough. The length and width of the boxes are perfect for mascaras and eyeliners as well as compact powders and lipsticks.


In this box I keep most of my blushers, bronzers, foundations and other round shaped products like highlighters and shaders. On the left I have my compact foundations and a highlight & shade duo, on the right I have my blushers and bronzers. I just tucked a few foundation shades into the front where there was room.


In this box I keep my lip products. I haven't had time to organise this properly yet, so it looks a bit thrown together, but I want to take time to arrange each product seperately so it all fits. I have lip glosses, lipsticks, lip liners, compact lipsticks and glosses and a lip palette in here. 


In this box I have my mascaras and a few liquid eyeliners. This was the smallest of the three boxes, but it's the perfect length for most of my mascaras. I also have a few palettes tucked down the side (Collection, MUA and an Acessorize one), and a little concealer set.

The bigger box at the back is actually a sweet box. You know, what corner shops have their pic 'n' mix in? Well, I discussed it with my local shop keeper and he's agreed to keep back all the boxes once the sweets have been sold. 


In this bigger box I have my single eyeshadows, plus my extra-length eyeliners as they literally didn't fit anywhere else!

Altogether I've finally arranged my make-up in a way that I'm really happy with, and it hardly cost me a thing!